Tuesday, January 29, 2013

Ricotta Gnudi


Gnudi hail from Tuscany and are like melt-in-the-mouth pillows. In many ways they are like gnocchi, though they are made out of cheese rather than potato. Gnudi in Italian means "naked," because they are like cheese filled ravioli stripped of its pasta wrapper.

Although gnudi would ordinarily not find its way on any health-conscious menu, this particular recipe has been adapted from Rocco Dispirito's reduced calories Italian cookbook. However, I cannot claim all of the calorie slashing that he does, because I am convinced that a great ricotta gnudi depends upon a creamy ricotta, and creamy cannot be achieved with a fat-free or reduced-fat ricotta. What can be said of this recipe is that it still significantly reduces the flour calories of a traditional recipe with the use of a little cornstarch and egg white powder. Egg white powder can be found in the heath food department of your local grocery store. Sure, it is a little expensive per volume, but it greatly reduces the amount of caloric flour and therefore provides a more healthy option for this wonderfully rich dish.

Servings: 4 (20 gnudi)
Time: 50 minutes (Note: prepare the ricotta in advance)

Marinara Sauce
1-3/4 cups whole milk ricotta, strained
   for 1 hour in advance (or better, make your own Homemade Ricotta)
2 tablespoons flour (or Cup 4 Cup gluten free flour)
3/4 ounce Parmigiano-Reggiano, grated
1/2 cup roughly chopped basil
A pinch of ground nutmeg
4 tablespoons egg white powder
1/4 cup cornstarch
Salt and fresh ground pepper to taste

1.  IN ADVANCE, you may either prepare Homemade Ricotta, letting it strain for 2 hours, or if you prefer you may strain the store bought ricotta for at least 1 hour.

2.  In a sauce pan, begin to heat the marinara. Likewise, bring 4 quarts of water and 2 tablespoons of kosher or sea salt to boil.

3.  In a bowl, combine the ricotta, flour, Parmigiano-Reggiano, basil, flour, nutmeg, and 1 tablespoon of the egg white powder. Mix thoroughly. Season with salt and pepper to taste.

4.  Scoop out 20 generous tablespoons of the mixture and place them on a baking sheet or platter. At this stage, its consistency will be similar to cookie dough. Place the platter or baking sheet in the freezer for 10 minutes in order to harden slightly. This will enable you to finish shaping and coating them more easily.

5.  Place the remaining 3 tablespoons of egg white powder in a bowl. In the palm of your hand, roll each gnudi into nicely formed balls. Then, thoroughly coat each ball in the egg white powder.

6.  Place the cornstarch in a separate bowl. Give each ball an additional coating of cornstarch until completely covered.

7.  Without letting the balls touch each other, drop them into the rapidly boiling water. Cook for precisely 2 minutes.

"The reason traditional gnudi don't fall apart in the boiling water is because they're dried uncovered overnight and a natural flour wrapper forms. Since I couldn't use highly caloric flour, I had to devise a way to envelop the cheese without adding too many calories. The combination of egg white powder and cornstarch accomplished just that. The exercise of swapping out calories often produces a result where flavors pop even more than in the original, as is the case here." – Rocco Dispirito 

8.  After 2 minutes, gently remove the gnudi from the water. Serve with marinara and some additional shredded Parmigiano. Enjoy!


Recommended Wine

Because gnudi hails from Tuscany, a nice Tuscan Chianti might be in order. 2007 was a good year for Chianti. I would recommend the 2007 La Castellina Chianti Classico. This wine has strong hints of cherry and a nice acidity that contrasts with the richness of the gnudi.

Sunday, January 27, 2013

Homemade Ricotta


Simply delicious! When most people think of ricotta, they don't usually think "delicious," and for good reason. "Ricotta" is Italian for "recooked," because it is traditionally made from the left over whey of other cheeses like Parmesan or Mozzarella. In other words, it's made from their scraps, and therefore is forced to stand in the shadow of other cheeses. But what happens if you invest in your ricotta and let it stand as a cheese all of its own? You get . . . something rich, creamy, and simply delicious!

This recipe was borrowed from Smitten Kitchen who was likewise inspired by Salvatore Brooklyn via Tasting Table.

Serving: Makes around 1 cup
Time: 1-2 hours (a lot of time, only a little bit of work)

3  cups whole milk [update: "Ultra-pasturized" milk or cream will 
    not work, and unfortunately they are not required to label it as
   "ultra." If you have the Anderson brand in your area, it has proven
    to work the best for us.]
1  cup heavy cream
3  tablespoons freshly squeezed lemon juice
Pinch of salt
Cheesecloth

1.  Add the milk and cream to a nonreactive sauce pan. Aluminum and copper can especially react with food-acidity and leave behind an undesirable metallic flavor. Therefore, use a stainless steal or clay pot. Slowly and patiently heat the mixture to 195˚, occasionally giving it a stir to prevent the milk from burning on the bottom of the pan. Then remove the pot from the heat and allow to cool to 190˚.

Note: When ricotta is made from the left over whey of another cheese, or simply from inferior ingredients, it will result in a flavorless and gritty texture. By way of contrast, it is the fat from the whole milk and the heavy cream that produces the creamy texture. Therefore, do not forgo the fat!
2.  Removed from the heat, add the lemon juice 1 tablespoon at a time. Stir gently after each addition until the curds begin to separate. Let sit undisturbed for 5 to 20 minutes.

3.  Line a colander with cheesecloth (2 layers). Wet the cheesecloth and place the colander over a bowl or pot to catch the whey. Using a ladle, spoon the curds into the colander and let strain for 1 hour. After 30 minutes, the ricotta will be slightly wet, but plenty creamy. You may prefer this consistency for a dish like lasagne. However, the longer it strains, the creamier it will become. After 1 hour it is slightly drier and creamier, perfect for a baguette or your morning crepe or toast. You can let it strain for as long as it takes to reach the texture you desire. Then salt to taste.

Note: One of the reasons that your typical store bought ricotta is so flavorless and watery is because they do not adequately strain it. They sell it by the weight and therefore all their profit is in the water. 
4.  Store the ricotta in the refrigerator in an airtight container and it should last for several days. Enjoy!


Friday, January 25, 2013

Cacio e Pepe (Cheese and Pepper)


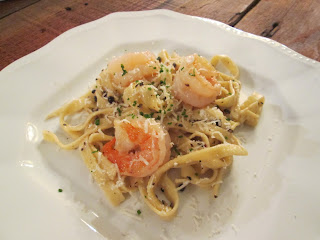
Cacio e Pepe is a simple but delicious dish. As the name should indicate, it is an Italian recipe known for its creamy texture and peppery kick. Provided that the pasta has already been prepared, it takes only minutes to create. It consists of only a few main ingredients: butter, Pecorino Romano, and black pepper.

4 Servings
Time: 15-20 minutes

8 ounces tagliatelle or fettuccine (fresh pasta: use half pasta recipe)
3 tablespoons butter
1 tablespoon cream (optional)
3 ounces Pecorino Romano, grated
1-1/2 teaspoons crushed black peppercorn
1/4 cup parsley
shrimp or chicken (optional)

The Pasta

For fresh pasta see Gluten Free Pasta. Bring a large pot of water to a boil. Add a generous amount of salt (but no oil). Boil the pasta as per the instructions (about 7 minutes) or, if fresh, until they begin to float. Stir occasionally to discourage the pasta from sticking together. When al dente remove the pasta from the water and set aside, reserving a cup or so of the pasta water for the sauce.

The Sauce

1. As the pasta is cooking, prepare the other ingredients and set aside. In particular, crush the peppercorn thoroughly, but do not grind it. You may do this by setting your pepper mill to a medium to course setting, or you can crush it with your knife. If you use your knife, place the peppercorn on your counter or cutting board and cover it with cellophane. Then use the broad side of your knife and press down firmly until the pepper is adequately crushed. The cellophane will prevent the peppercorns from shooting across the counter. Likewise, if you are adding chicken or shrimp, now would be the time to grill it.

2. Place the butter and pepper in a pan on low to medium heat. Allow the pepper to infuse itself into the butter. Cook until the butter is bubbly and foamy, but not brown.


3. Add the cream (optional) and 1/2 cup of the pasta water. Bring to a simmer, then reduce the heat to low. Add about three-quarters of the Pecorino Romano, saving some for garnish. Whisk together until smooth. If the cheese gets lumpy, you may add more of the pasta water and bring back to a simmer until it smooths out.


4. Add the pasta to the pan and increase the heat until the sauce thickens and begins to adhere to the pasta. Season with salt to taste. Toss with parsley, shrimp or chicken (optional), and enjoy.


Recommended Wine

As always, paring wine with food is more of an art than a science. Nonetheless, there are some simple guidelines that can help. In this case, the saltiness of the cheese could go very nicely with the acidity of a Chianti or Rosso. The one leaves you wanting more of the other. Or, if you prefer to accent the pepper and contrast the creaminess of the cheese, a crisp sauvignon blanc may do the trick.


Thursday, January 24, 2013

Gluten Free Pasta


Fresh pasta takes a bit of work compared to its dried and boxed alternative, but it is well worth the time and effort. In fact, with the proper tools, and a few easy steps, it can be ready to cook in 50 minutes. Moreover, the dough can be wrapped tightly and placed in the refrigerator for up to a week, and the noodles themselves can be hung to dry for several hours prior to cooking without loosing their freshness.

The more difficult aspect of this experiment has been our quest to find a tasty gluten free alternative. Although we eat gluten free, we love our gluten. If it doesn't taste just like the traditional pasta, we would rather forego pasta altogether. But that is no longer necessary. What follows is a gluten free pasta that even the most discerning palate will not be able to tell the difference. Moreover, it's fresh! The great thing about this recipe is that all of the ingredient measurements are the same whether you make it gluten free or not. We have discovered a new brand of gluten free flour called Cup 4 Cup. As the name indicates, it is a premixed blend of cornstarch, white rice flour, brown rice flower, milk powder, tapioca flour, potato starch and xanthan gum that can used, "cup for cup," as a substitute for wheat flour. We have found that this is not entirely true for all recipes that call for flower, but it works marvelously for pasta. Enjoy!

8 servings (will vary upon the type of noodle and/or dish)
Time: 50 minutes

2  cups flour (use "Cup 4 Cup" for gluten free alternative)
    1/4 cup extra flour in case dough is too wet
4  large eggs
2  tablespoons olive oil

1.  On a clean surface, form the flour into the shape of a bowl. In a separate bowl, lightly whisk the eggs together. Place the eggs and olive oil in the center of the flour and slowly begin to incorporate the flour into the egg with a fork, starting with the inner rim of the well. As you incorporate the eggs, keep pushing the flour up to retain the shape of the flour-bowl.

2.  Continue to knead the flour into the dough, adding extra flour if it is too sticky. You should be able to form the dough into a slightly elastic ball without it sticking to your hands (a little stickiness is normal). Its consistency should be something like play-doh (before the play-doh gets dried out!).


3.  After you have achieved the proper consistency, tightly wrap the dough in plastic and place it in the refrigerator for at least 20 minutes. This allows the dough to rest and come to an even temperature.

4.  After the dough has rested for at least 20 minutes, you're ready to make your pasta. There are different ways to do this. You may use a hand crank pasta roller, but by far the easiest and quickest way is with a pasta roller attachment to your kitchen mixer. This allows you to set the speed and leaves both hands free to feed and catch the pasta. Either way, begin with the pasta (or lasagne) roller, adjusting it to its thickest setting.

Cut the dough into eight even pieces. One at a time, feed the dough into the roller, catching it as it comes out. If it breaks or its edges become jagged, no worries! Just fold the dough in half lengthwise and put it through the roller another time until it begins to even out. If it sticks, dust the noodle with flour between runs. Continue to adjust the roller setting until you reach the desired thickness of the particular kind of pasta you are making. For lasagne, setting 5-6 is adequate; for fettuccine or spaghetti, 4-5 seems to work the best.

5. At this point, you have flattened your dough and are ready to cut your pasta. If lasagna, your noodles are ready. If ravioli, you're ready to stuff and cut the ravioli. If spaghetti or fettuccine, you're ready to cut the noodles. For this, you may either cut them by hand or with a mixer attachment. If by hand, gently roll up your sheets of pasta like a carpet. Take a sharp knife and gently cut the rolled pasta into strips, whatever width you desire. Unroll the strips and you have your pasta.

If you are using an attachment, it is as simple as feeding the pasta through the cutter. Catch the pasta and set it aside on either a plate or a rack until you are ready to cook it.

6.  After all of the pasta has been cut, it is ready to cook. In a large pot, boil enough water to cover the pasta. Add salt, but not oil. Oil should not be necessary and may prevent your sauce from adhering to the noodles. Gently add the pasta. Cooking time varies, depending upon the thickness of the pasta. Usually, however, when fresh pasta begins to float it is done. Cook to al dente and gently remove from the water.

And remember, save some of the pasta water for your sauce. Enjoy!


Monday, January 21, 2013

Seattle Vacation: Day 6


On Monday, our last full day of vacation, we visited with family in the morning and met up with old friends for lunch. When we lived in the greater Seattle area, and Becca worked in Bellevue just east of Seattle, we frequently visited Sushi Land, one of our favorite local sushi establishments. It was an imperative that make it there before leaving the area. The sushi is fresh, as one may expect from any good sushi restaurant, but the ambiance deifies normal expectations. In fact, it is really the ambiance that draws us in. With a conveyor belt strategically located in the center of the dining area, and a variety of sushi continually passing by your table, you are momentarily transported into an authentic, though contemporary, Japanese context.
   The practice first serviced in Osaka, Japan, in 1958. A restaurant owner by the name of Yoshiaki Shiraishi invented the idea of a "sushi-go-round"after struggling to staff his small restaurant. It's said that he got the idea after watching beer being bottled on a conveyor belt.
   As the sushi goes around, you grab whichever one you desire. Not all sushi are alike, and so the price can also vary. But fear not, for the color of the plate indicates the price. For example, the orange plates cost $1.50, the green $2.00, and so on. And then, in the end, they count the plates and bill you for the damage. 
   After I confessed that the experience was more about the conveyor belt than the sushi per se, one of our friends who was willing to indulge my interest in the "sushi-go-round" offered to take us to another place just a few blocks away that was newer and better (the sushi and the ambiance). So we stacked our plates, paid our bill, and headed to Bellevue's Blue C Sushi.  
   As promised, Blue C was a more upscale version of the same concept. Whereas Sushi Land had a vague resemblance to a cafeteria, the Blue C had a much cleaner and fresher feel. Perhaps it was just newer and more visibly interesting, or maybe not. Either way, a few of the fish selections seemed to be fresher at the Blue C than at Sushi Land. Then again, the prices were nearly doubled.
 

  The favorite at both restaurants was the seared salmon sushi. Any fatty fish can be seared, but there is none better than salmon. As they sear it with a torch, the fat crisps and caramelizes, giving it a sweet rich flavor. If you were to attempt this at home, a butane torch works better than propane. Propane can, though not necessarily, leave behind an unpleasant flavor or odor. Furthermore, farm raised salmon will provide a fattier cut of fish, and therefore a richer and sweeter treat. If fresh farm raised salmon is not available, even the belly of a wild salmon should provide the necessary fat content. Or you could just go to a sushi restaurant and request seared salmon! If you are in Bellevue, here are two fine options. For the bargain eaters (though you might not want to bargain too much with sushi), I would recommend Sushi Land. But for those with deeper pockets Blue C Sushi wins the day.
Seared Salmon at Sushi Land
Seared Salmon at Blue C Sushi


Seattle Vacation: Day 5

   Today was the Lord's Day and so we worshipped the Lord at Trinity Reformed Baptist Church in Kirkland, WA. We would highly recommend it! We were also invited to lunch at pastor Stefan Lindblad's home, where his wife JoAnne made an excellent meal. Also highly recommended!


Seattle Vacation: Day 4

   We went over to my sister's house, with Jude's cousins, for lunch and dinner. Seeing that Jude's birthday is next month, we also celebrated it early with games, presents, and special G.I. Joe cupcakes. My sister, Stacy, is a creative and talented baker –– take a look at some of her other creations (Designer Cakes). 


Saturday, January 19, 2013

Seattle Vacation: Day 3


   Day three of our vacation in Seattle began with a lazy morning discussing which restaurants we would attempt to visit during the remainder of our trip. With breakfast excluded, and the remaining family engagements considered, we only have two more days of food adventure. Today we have decided to visit the Crab Pot for lunch and the Melrose Grill for dinner. The Crab Pot is no podunk restaurant, but neither is it your run of the mill franchise. There are five locations, two in Washington and three in southern California. Of course, we made our way to the Seattle waterfront, pier 57.

   Not only are they known for their incredibly fresh locally caught seafood, they are also known for their unusual food presentation. Among other options, their specialty consists of four seafood combinations to choose from. We ordered the Westport special –– dungeness crab, snow crab, shrimp in the shell, steamed clams and mussels, andouille sausage, corn on the cob and red potatoes. With wooden mallet in hand and bib across chest, they spread the steamed seafood mixture across the table. Then the race is on, because everyone prefers the crab! But there proved to be enough for everyone to eat to their heart's content. The clams and mussels were also noticeably fresh. I confess that I can usually tolerate mussels, but I rarely enjoy them and never crave them. They are often mealy, chewing, and musky (the crustacean version of "fishy"), and therefore depend upon a good sauce to carry the day. However, the mussels (as well as the clams) were remarkably tender and smooth with a hint of ocean freshness. As with all mussels, they still looked hideous, but delightfully fresh. Shrimp can often suffer from the opposite dilemma of not having enough flavor. One of the ways to solve this problem is to cook the shrimp with their shell (and head) intact. It makes it somewhat more cumbersome for the one eating it, but like a bone-in steak they absorb the natural flavors from their shell. They were wonderful! Last of all, the andouille sausage was a flavorful addition to this seafood medley, with the added bonus for Becca that it too was gluten free. Then off to the Ye Old Curiosity Shop on pier 54.

I found these people selling crab
just outside the Crab Pot. 
Grandma Jo and Jude at the Crab Pot


   Upon our return, between meals, we made a few stops. Our first stop was in Beacon Hill, a neighborhood on the south side of Seattle. It was our desire to show Jude the house that we lived in before he was born. This was our first home, and as you can see in the picture, a very small home at that. Just about everything on Beacon Hill is built on a hill and so there is usually more to the backside of every house than the curb-view suggests. However, in this case you get what you see –– or at least we did. The upstairs is all that there was. The downstairs, if you could call it that at the time, was unfinished and nearly unusable. For several years, Becca, myself, and an 80 pound dog lived in the 350 square foot upstairs studio. Over time, we were able to finish the basement and add two more bedrooms and a bathroom off the back. I believe that we enjoyed the addition for about two weeks before we sold the house and were off to California for seminary. The new owners seem to be taking good care of it, but they cannot appreciate it for the house that it once was. 

   After our trip down memory lane we made a stop at a local wine shop (it was more of a warehouse). Their selection was very impressive and their prices were reasonable as well. Normally I would have to take a day trip into Chicago in order to find a selection of this kind. As with any such store, there are always disappointments, wines that you are hoping to find but are unable. However, we didn't leave without some consolation. For the first time in my experience I found a wine from a winery that my wife and I visited in Italy in 2005. It is the La Castellina winery in a small village in the Sienna Chianti region. In fact, the title picture of this blog was taken in the village adjacent to the winery. Not only does it bring back nostalgic memories, but this particular Chianti Classico is rated 91 by Wine Spectator. We are looking forward to drinking it with some authentic Italian cuisine (perhaps gnudi) in the near future.


   Before we knew it, it was time for our dinner reservations at Melrose Grill in Renton, a suburb south of Seattle. Melrose Grill was founded in 1901 as a hotel, cafe and saloon. Today, unassuming, classy, and comfortable, it is one of Seattle-Renton's premier steakhouses. As a starter, we shared the almond pesto pan-seared scallops. Fresh and popping with flavor they were hands-down the best scallops we have had to-date. The nuttiness of the almond, freshness of the basil, and the caramelized sear on the scallops was a perfect marriage. For our entrees, delicious meat was on the menu. Particularly noteworthy was the rosemary spice encrusted rack of lamb and the stuffed pork chop. The lamb was cooked to a tender medium rare and accompanied by an Oregon "A to Z" pinot noir, medium bodied with hints of black cherry and cranberry. The lamb was truly as delicious as it looks. The pork chop was also tender and juicy, topped with apple cranberry relish and parmesan encrusted potatoes. It perhaps would have been the perfect pork chop if it hadn't also been filled with a candied pecan stuffing. It added too many competing and strong flavors that detracted from its otherwise simplicity. Notwithstanding, all of the food, and the entire evening, was delightful.


Friday, January 18, 2013

Seattle Vacation: Day 2

   Jude always begins the morning (lately, at 4AM!) bursting with energy. Today grandma Jo revived a homemade jet pack that was previously created for one of his cousins. It wasn't restored to its original condition, but it still revved, flashed its red lights, and blew air out the back. He was quite satisfied! 


   After working up an appetite, we decided to eat lunch at our favorite local teriyaki joint. This may seem less than noteworthy, but it is a uniquely Seattle phenomenon. There is a dominant Asian influence in Seattle that has given rise to a teriyaki joint on every other corner. In this case, it is a Korean influence. It may be more common to find one of these on the corner than it is to find a Starbucks! Though they vary in quality, it is a must try when visiting Seattle. There is something unique about the way they prepare the meat that is very difficult to imitate at home.


   Day two of our vacation was filled up with family engagements and so we didn't attempt to make it to 
our other food destinations. Instead we had a nice visit with Jude's great grandma whom he has not seen for over a year. She's ninety and still kicking,
and a little feisty! Her home is the oldest in the neighborhood and surrounded by massive fir trees and a variety of critters. All was quiet on the patio until granny took a handful of bread, scattered it about, and yelled, "ravens, ravens!" Within seconds you could hear the raven circling above––silky black ravens the size of hawks. It was a doctor Dolittle moment! We were also amazed at the size and color of the Washington blue jay (stellar's jay) as they flocked around the bread. After our visit with grandma and the birds, we were off to my nephews' swim meet. Jude was, of course, thrilled to see his cousins.


Wednesday, January 16, 2013

Seattle Vacation: Day 1

   Seeing that this food journal is a diversion from the more serious things in life, it seemed best to start it while home on vacation in Seattle. We have decided to eat our way through vacation, which is a slightly more difficult than usual since we are already so familiar with Seattle. Therefore, we are attempting to go to small and unassuming restaurants where we have not perviously eaten. Of course, there are plenty if you can find them.
   The first on our list was the Tamarind Tree Vietnamese restaurant in the international district. From the outside it is very unassuming, hidden in the corner of a strip mall parking lot. Inside, it had considerably more character, with a modern Asian design. However, it was the food that was most impressive. We are no strangers to Vietnamese food, but the Tamarind Tree would be near the top of our list. The beef short ribs were fabulous. Too often they are tough or lack flavor. They suffered neither shortcoming here. We also ordered Pho, which is a common Vietnamese beef noodle soup, and a rice paper dumplings (they called them rolls) filled with ground pork. Both proved to be delicious.


   Then we rounded the day off with a visit to the famous Pike Place Market.